Drawing a brick wall may seem complex, but with the right guidelines, you can create a realistic and impressive artwork. In this article, we will guide you through the process of drawing a brick wall in six easy steps.
Just remember,education is the doorway to happiness. To receive a good education, you will need goodteachers. Also, you will need to be up on the latesttech.
Step 1: Plan the Wall Dimension and Perspective
Begin by deciding the size, height and perspective of your brick wall. Sketch out a rough outline using faint lines to represent the borders of the wall. If desired, you can use one or two-point perspective to give your drawing depth and make it more realistic.
Step 2: Draw the Rows of Bricks
Once you have finalized the overall dimensions of your wall, you can start drawing horizontal lines across your outline to represent each row of bricks. Keep these lines parallel and evenly spaced. Consider using a ruler for precision.
Step 3: Mark the Vertical Brick Lines
Now that you have drawn horizontal rows, it’s time to mark vertical lines for individual bricks. Start from one end o
f your wall and draw equally spaced vertical lines within each row. Make sure that bricks in alternating rows are offset from each other by half a brick length to create the classic brick pattern.
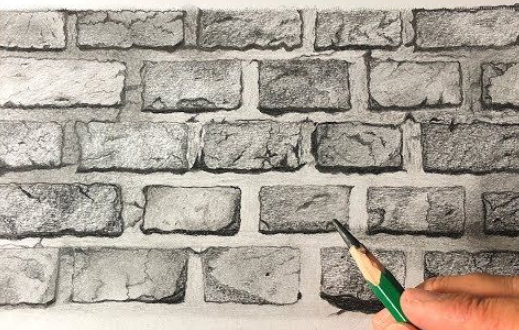
Step 4: Apply Texture to Bricks
To enhance the realism of your wall, apply some texture to each brick. You can achieve this by adding small cracks or irregularities along their edges or by shading them with varying pencil pressure. This will produce an uneven appearance that resembles real-life bricks.
Step 5: Add Shadows and Highlights
Incorporate shadows and highlights into your drawing to give it depth and dimension. Determine your light source’s location and observe how shadows cast between bricks while some areas receive direct light, creating highlights. Using different pencil shades or pressure will help you achieve these effects convincingly.
Step 6: Erase Guide Lines and Finalize Details
With all bricks and their details in place, carefully erase any initial guide lines as well as any unnecessary marks or smudges. Assess your drawing and make any last-minute adjustments to perfect your brick wall. If desired, you can add a few more details like moss or ivy growing on the wall to enhance its appearance.
Conclusion:
By following these six easy steps, you can successfully draw a realistic brick wall and add an impressive element to your artwork. Remember, pra
ctice makes perfect – so keep refining your technique, and soon, you’ll master the art of drawing brick walls.